SG T-Type™ (Internal Mix)
Pros
- Cheap to build
- No pressure washer required
Cons
- Makes tiny amounts of snow.
- If compressor is shut off for any reason PERMANENT DAMAGE can occur to compressor from water backing down the air line and into the compressor.
- Needs constant attention to keep air water balance
- Galvanized plumbing will rust inside & cause excessive nozzle wear.

Requirements for operation of the SG T-Type™ Snowmaker
- Compressor with a minimum rating of 10CFM @ 90PSI
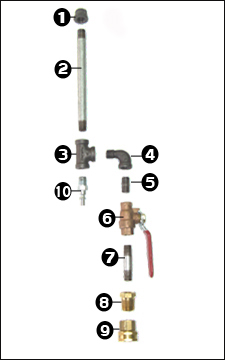
Parts List
- ¼” cap – QTY 1
- 6” x nipple – QTY 1
- ¼” x Tee – QTY 1
- ¼” x 90 DEG street elbow – QTY 1
- ¼” close nipple – QTY 1
- ¼” mini ball valve – QTY 1
- 2” x nipple – QTY 1
- ¼”female x ½”male bushing – QTY 1
- ½”female to Garden – QTY 1
- Quick connect air fitting – QTY 1
Other miscellaneous items you will need
- Roll of Teflon tape
- 7/64” drill bit
How the SG T-Type™ Snowmaker works
This design utilizes internal mixing. The T-Type™ snowmaker works by mixing low pressure water (household water pressure no pressure washer) and compressed air internally. This design works just like the nucleation nozzle that is on the SAH-SG2 Combo™ design snowmaker. Because this design works similar to a nucleation nozzle the snow production is very small but it makes a great, simple to build, entry level snowmaker.
For more information on how man made snow is made check out our snowmaking science page.
Assembling your SG T-Type™ Snowmaker
- You can purchase the parts in the list above at most hardware or home improvement stores.
- Start you project by Drilling a 7/64” hole in the center of the pipe cap (part#1).
- Assemble the parts exactly as they are shown in the photo. All connections must have Teflon tape pipe sealer before final assembly.
Operating the SG T-Type™ Snowmaker
- First step is to check if the weather conditions are right for snowmaking.
- You will need to attach your SAH-SG T-Type™ Snowmaker to something secure like a ladder or fence post. You can do this with large wire ties or metal hose clamps.
- Connect your garden hose to water spigot and to the garden connection on your snowmaker.
- Connect the air hose from your compressor to the snowmaker using the quick connect fitting.
- Make sure to close the ball valve on the snowmaker and turn on your compressor.
- Turn on your water.
- You should now have just air comming out of the pipe cap.
- Open the ball valve slowly until you have a steady spray of water and air coming out. It is typical for you to get a pulsing flow, adjust the ball valve to get the steadiest stream possible.
- If the weather conditions are right for snowmaking you should now be making snow! (Keep in mind with this design there is very little snow production. It will take several hours to develop a small pile of snow.)
- HAVE FUN AND ENJOY!
Due to the nature of the free plans provided we do not offer technical advice on construction or operation on any of the free snowmaker plans.
All free plans are for personal, non-commercial use, copyrighted plans are not to be used to sell a product or service. You may not copy, distribute, reproduce, modify, transmit, publish, upload, reuse, re-post, or otherwise display the Content for public or commercial purposes.


