SG3 E-Type™ (External Mix)
Pros
- Inexpensive to build
- Efficient design (external mixing)
Cons
- Higher degree of difficulty to construct.
Requirements for operation of the SG3 E-Type™ Snowmaker
- Pressure washer with a pressure range of 1200PSI to 1800PSI and 1.3 – 1.7gpm
- Compressor with a minimum rating of 5.4 CFM @ 90PSI *Please read the FAQ’s on compressor ratings.
Construction of the SG3 E-Type™ Snowmaker
NOTE: Make sure to use Teflon tape on all threaded fittings.
Because this design can be constructed in a variety of ways, we do not supply a detailed parts list. Review the guide below and choose a method of construction that suits the resources available to you.
Below is a schematic drawing of the snow maker in its most basic form. This drawing will give you a better understanding of what you are looking to construct.
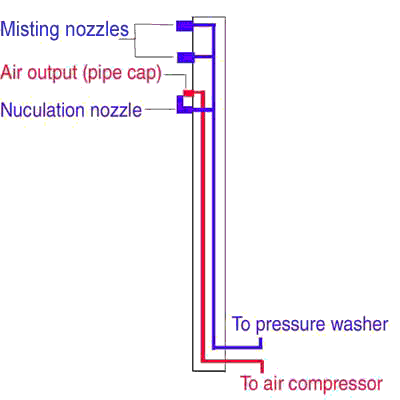
Accomplishing what you see above is all you need to construct to build a fully functional snowmaker. This can be done with standard ¼” or 1/8” plumbing or hydraulic hose you can have cut with fittings put on for you at your local truck supply as shown below.
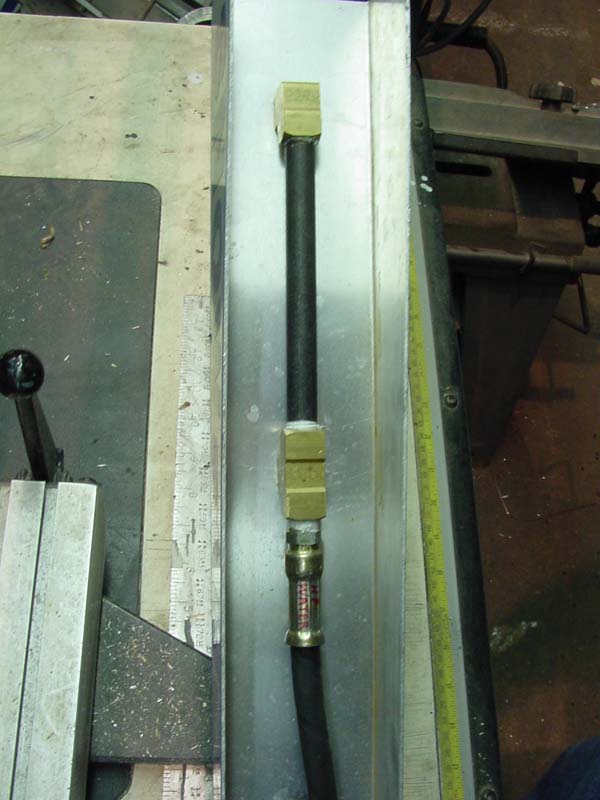
Plumbing
We used 1/4inch Hydraulic hose for our plumbing in the photo above. This hose can be cut to any length and have various fittings crimped on the ends. Hydraulic hose can be made up for you at most truck parts stores and is relatively inexpensive. We had 1/4inch male NPT thread fittings crimped on all ends. If hydraulic hose is not available to you, any plumbing can be used to achieve the configuration of the above diagram. Make sure your choice of plumbing can support the pressure of the pressure washer you plan on using with your snowmaker.
Nozzle head
The head shown above was fabricated from .063 aluminum folded into a 3”x3” channel. You will need access to a sheet metal brake. You can make yours out of whatever is most available to you. Some suggestions would be 3 or 4inch PVC tubing with the back cut out on top to make the connections. Or possibly some extruded 3×3 square aluminum tubing from your local metal distributor.
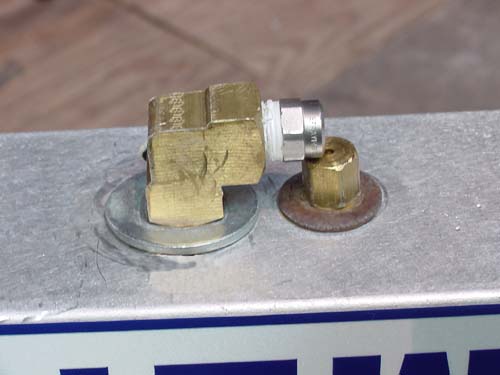
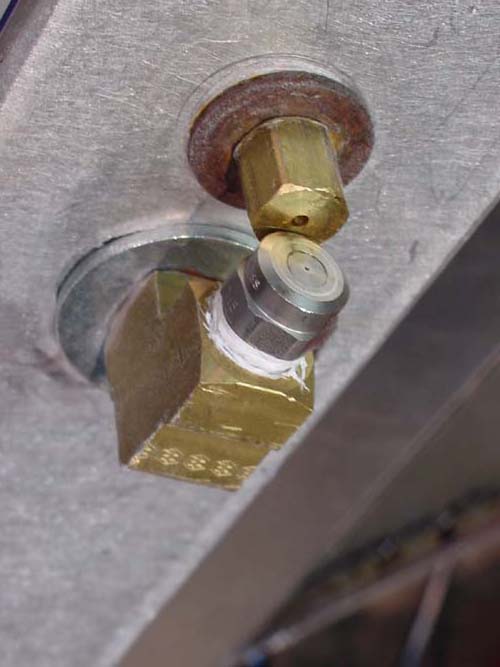
Nozzles & Air cap
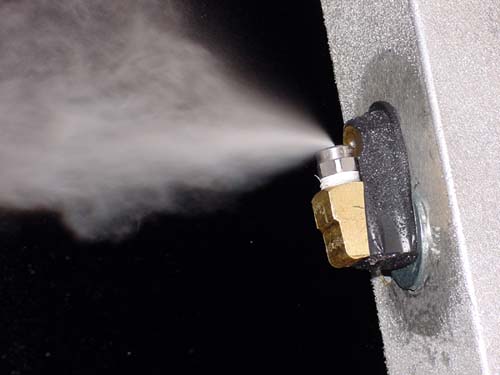
We have put together the SAH-SG3 External Mix nozzle kit™ for this design. It comes with 2 SAH custom upper misting nozzles, the Nucleation nozzle, and the Precision Air Nozzle required to make this design work. These nozzles are custom stainless steel snowmaking nozzles, they cannot be purchased at your local hardware store. (For more information on the importance of nozzle choice click here) Spacing between all nozzles should be 7”. If you are not using SAH nozzles, you will need to drill a 7/64″ hole in a pipe cap for the air. This air stream needs to intersect with the nucleation nozzle at a 90° angle like in the photos. The alignment of the air and nucleation nozzle is very important. When proper alignment is achieved it should look like the third photo when running.
High Pressure water and air connections
To connect your snowmaker to the pressure washer you can purchase a pressure washer extension hose with 22mm swivel connection on both ends. Use a 22mm fitting on the snowmaker to attach the pressure extension hose. Use a quick connect air fitting on your snowmaker to attach the air line from your compressor.
Operating the SG3 E-Type™ Snowmaker
- Check the Weather Conditions are right for snowmaking. (Use SNOWatHOME’s Weather Tools)
- Attach your SAH-SG3 E-Type™ Snowmaker to something secure like a ladder or fence post. You can do this with large wire ties or metal hose clamps.
- Connect one end of the pressure washer extension hose to the 22mm fitting side of the snowmaker. Connect the other end to your pressure washer.
- Connect the air hose from your compressor to the snowmaker using the quick connect fitting.
- Connect a garden hose from your pressure washer to your water spigot.
- Turn on your compressor
- Turn on the water
- Turn on your pressure washer
- You should now have high pressure water coming out of the top 2 upper misting nozzles and the bottom nucleation nozzle.
- If the weather conditions are right for snowmaking you will now be making snow!
- HAVE FUN AND ENJOY!
Due to the nature of the free plans provided we do not offer technical advice on construction or operation on any of the free snowmaker plans.
All free plans are for personal, non-commercial use, copyrighted plans are not to be used to sell a product or service. You may not copy, distribute, reproduce, modify, transmit, publish, upload, reuse, re-post, or otherwise display the Content for public or commercial purposes.


